AZ-104 Microsoft Azure Administrator certificate
Sources of this notes
Configure Azure resources with tools
There's approximate parity between the portal, the Azure CLI, and Azure PowerShell with respect to the Azure objects they can administer and the configurations they can create. They're also all cross-platform. Typically, you'll consider several factors when making your choice:
- Automation: Do you need to automate a set of complex or repetitive tasks? Azure PowerShell and the Azure CLI support automation, but Azure portal doesn't.
- Learning curve: Do you need to complete a task quickly without learning new commands or syntax? The Azure portal doesn't require you to learn syntax or memorize commands. In Azure PowerShell and the Azure CLI, you must know the detailed syntax for each command you use.
- Team skillset: Does your team have existing expertise? For example, your team might have used PowerShell to administer Windows. If so, they'll quickly become comfortable using Azure PowerShell.
Azure Cloud Shell
- Is temporary and requires a new or existing Azure Files share to be mounted.
- Offers an integrated graphical text editor based on the open-source Monaco Editor.
- Authenticates automatically for instant access to your resources.
- Runs on a temporary host provided on a per-session, per-user basis.
- Times out after 20 minutes without interactive activity.
- Requires a resource group, storage account, and Azure File share.
- Uses the same Azure file share for both Bash and PowerShell.
- Is assigned to one machine per user account.
- Persists $HOME using a 5-GB image held in your file share.
- Permissions are set as a regular Linux user in Bash.
Azure PowerShell
Azure PowerShell is a module that you add to Windows PowerShell or PowerShell Core to enable you to connect to your Azure subscription and manage resources. Azure PowerShell requires PowerShell to function. PowerShell provides services such as the shell window and command parsing. Azure PowerShell adds the Azure-specific commands.
See cheat sheet for Azure Powershell.
Azure CLI
Azure CLI is a command-line program to connect to Azure and execute administrative commands on Azure resources. The Azure CLI is available two ways: inside a browser via the Azure Cloud Shell, or with a local installation on Linux, Mac, or Windows. It allows administrators and developers to execute their commands through a terminal, command-line prompt, or script instead of a web browser.
See cheat sheet for Azure CLI.
Azure Resource Manager (ARM)
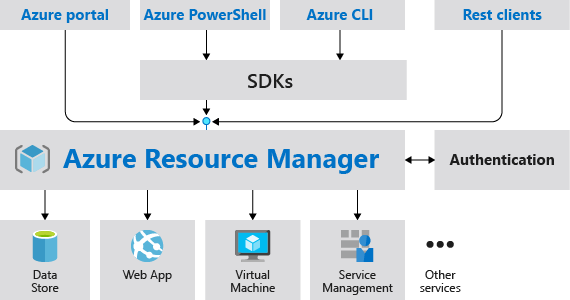
Azure Resource Manager provides several benefits:
- You can deploy, manage, and monitor all the resources for your solution as a group, rather than handling these resources individually.
- You can repeatedly deploy your solution throughout the development lifecycle and have confidence your resources are deployed in a consistent state.
- You can manage your infrastructure through declarative templates rather than scripts.
- You can define the dependencies between resources so they're deployed in the correct order.
- You can apply access control to all services in your resource group because Role-Based Access Control (RBAC) is natively integrated into the management platform.
- You can apply tags to resources to logically organize all the resources in your subscription.
- You can clarify your organization's billing by viewing costs for a group of resources sharing the same tag.
Two concepts that I need to review for this:
- resource provider - A service that supplies the resources you can deploy and manage through Resource Manager. Each resource provider offers operations for working with the resources that are deployed. Some common resource providers are Microsoft.Compute, which supplies the virtual machine resource, Microsoft.Storage, which supplies the storage account resource, and Microsoft.Web, which supplies resources related to web apps. The Microsoft.KeyVault resource provider offers a resource type called vaults for creating the key vault, useful if you want to store keys and secrets. The name of a resource type is in the format: {resource-provider}/{resource-type}. For example, the key vault type is Microsoft.KeyVault/vaults.
- declarative syntax - Syntax that lets you state "Here is what I intend to create" without having to write the sequence of programming commands to create it. The Resource Manager template is an example of declarative syntax. In the file, you define the properties for the infrastructure to deploy to Azure.
Resource groups
Creating resource groups:
- All the resources in your group should share the same lifecycle. You deploy, update, and delete them together. If one resource, such as a database server, needs to exist on a different deployment cycle it should be in another resource group.
- Each resource can only exist in one resource group.
- You can add or remove a resource to a resource group at any time.
- You can move a resource from one resource group to another group. Limitations do apply to moving resources.
- A resource group can contain resources that reside in different regions.
- A resource group can be used to scope access control for administrative actions.
- A resource can interact with resources in other resource groups. This interaction is common when the two resources are related but don't share the same lifecycle (for example, web apps connecting to a database).
When creating a resource group, you need to provide a location for that resource group. You may be wondering, "Why does a resource group need a location? And, if the resources can have different locations than the resource group, why does the resource group location matter at all?" The resource group stores metadata about the resources. Therefore, when you specify a location for the resource group, you're specifying where that metadata is stored. For compliance reasons, you may need to ensure that your data is stored in a particular region.
Moving resources:
When moving resources, both the source group and the target group are locked during the operation. Write and delete operations are blocked on the resource groups until the move completes. This lock means you can't add, update, or delete resources in the resource groups. Locks don't mean the resources aren't available. For example, if you move a virtual machine to a new resource group, an application can still access the virtual machine.
Move operation support for resources: This page details what resources can be moved between resources group, subscriptions, and regions.
To move resources, select the resource group containing those resources, and then select the Move button. Select the resources to move and the destination resource group. Acknowledge that you need to update scripts.
Deleting resources:
See how to remove a resource group using Azure powershell.
Determine resource limits:
- The limits shown are the limits for your subscription.
- When you need to increase a default limit, there is a Request Increase link.
- All resources have a maximum limit listed in Azure limits.
- If you are at the maximum limit, the limit can't be increased.
Azure Resource Manager Locks
Creating Azure Resource Manager Locks:
Resource Manager locks allow organizations to put a structure in place that prevents the accidental deletion of resources in Azure.
- You can associate the lock with a subscription, resource group, or resource.
- Locks are inherited by child resources.
Only the Owner and User Access Administrator roles can create or delete management locks.
Azure Resource Manager template
An Azure Resource Manager template precisely defines all the Resource Manager resources in a deployment. These are some benefits:
- Templates improve consistency. Resource Manager templates provide a common language for you and others to describe your deployments. Regardless of the tool or SDK that you use to deploy the template, the structure, format, and expressions inside the template remain the same.
- Templates help express complex deployments. Templates enable you to deploy multiple resources in the correct order. For example, you wouldn't want to deploy a virtual machine prior to creating an operating system (OS) disk or network interface. Resource Manager maps out each resource and its dependent resources, and creates dependent resources first. Dependency mapping helps ensure that the deployment is carried out in the correct order.
- Templates reduce manual, error-prone tasks. Manually creating and connecting resources can be time consuming, and it's easy to make mistakes. Resource Manager ensures that the deployment happens the same way every time.
- Templates are code. Templates express your requirements through code. Think of a template as a type of Infrastructure as Code that can be shared, tested, and versioned similar to any other piece of software. Also, because templates are code, you can create a "paper trail" that you can follow. The template code documents the deployment. Most users maintain their templates under some kind of revision control, such as GIT. When you change the template, its revision history also documents how the template (and your deployment) has evolved over time.
- Templates promote reuse. Your template can contain parameters that are filled in when the template runs. A parameter can define a username or password, a domain name, and so on. Template parameters enable you to create multiple versions of your infrastructure, such as staging and production, while still using the exact same template.
- Templates are linkable. You can link Resource Manager templates together to make the templates themselves modular. You can write small templates that each define a piece of a solution, and then combine them to create a complete system.
- Templates simplify orchestration. You only need to deploy the template to deploy all of your resources. Normally this would take multiple operations.
The template uses a declarative syntax. The declarative syntax is a way of building the structure and elements that outline what resources will look like without describing the control flow. Declarative syntax is different than imperative syntax, which uses commands for the computer to perform. Imperative scripting focuses on specifying each step in deploying the resources.
ARM templates are idempotent, which means you can deploy the same template many times and get the same resource types in the same state.
Resource Manager orchestrates deploying the resources so they're created in the correct order. When possible, resources will also be created in parallel, so ARM template deployments finish faster than scripted deployments.
Resource Manager also has built-in validation. It checks the template before starting the deployment to make sure the deployment will succeed.
You can also integrate your ARM templates into continuous integration and continuous deployment (CI/CD) tools like Azure Pipelines.
The schema:
| Element name | Required | Description |
|---|---|---|
| $schema | Yes | Location of the JSON schema file that describes the version of the template language. Use the URL shown in the preceding example. |
| contentVersion | Yes | Version of the template (such as 1.0.0.0). You can provide any value for this element. Use this value to document significant changes in your template. This value can be used to make sure that the right template is being used. |
| parameters | No | Values that are provided when deployment is executed to customize resource deployment. |
| variables | No | Values that are used as JSON fragments in the template to simplify template language expressions. |
| functions | No | User-defined functions that are available within the template. |
| resources | Yes | Resource types that are deployed or updated in a resource group. |
| outputs | No | Values that are returned after deployment. |
Let's start with parameters:
This would be an example:
You're limited to 256 parameters in a template. You can reduce the number of parameters by using objects that contain multiple properties.
Azure Quickstart Templates are Azure Resource Manager templates provided by the Azure community. Some templates provide everything you need to deploy your solution, while others might serve as a starting point for your template.
- The README.md file provides an overview of what the template does.
- The azuredeploy.json file defines the resources that will be deployed.
- The azuredeploy.parameters.json file provides the values the template needs.
It caught my eye: https://github.com/azure/azure-quickstart-templates/tree/master/application-workloads/blockchain/blockchain
You can deploy an ARM template to Azure in one of the following ways: - Deploy a local template - Deploy a linked template - Deploy in a continuous deployment pipeline
Example: To add a resource to your template, you'll need to know the resource provider and its types of resources. The syntax for this combination is in the form of {resource-provider}/{resource-type}.
See the code:
**To create a ARM template use Visual Studio Code with the extension "Azure Resource Manager (ARM) Tools for Visual Studio Code". **
Biceps templates
Bicep is a domain-specific language (DSL) that uses declarative syntax to deploy Azure resources. In a Bicep file, you define the infrastructure you want to deploy to Azure, and then use that file throughout the development lifecycle to repeatedly deploy your infrastructure. Your resources are deployed in a consistent manner. Bicep provides concise syntax, reliable type safety, and support for code reuse. Bicep offers a first-class authoring experience for your infrastructure-as-code solutions in Azure.
How does Bicep work?
When you deploy a resource or series of resources to Azure, the tooling that's built into Bicep converts your Bicep template into a JSON template. This process is known as transpilation. Transpilation is the process of converting source code written in one language into another language.
Bicep provides many improvements over JSON for template authoring, including:
-
Simpler syntax: Bicep provides a simpler syntax for writing templates. You can reference parameters and variables directly, without using complicated functions. String interpolation is used in place of concatenation to combine values for names and other items. You can reference the properties of a resource directly by using its symbolic name instead of complex reference statements. These syntax improvements help both with authoring and reading Bicep templates.
-
Modules: You can break down complex template deployments into smaller module files and reference them in a main template. These modules provide easier management and greater reusability.
-
Automatic dependency management: In most situations, Bicep automatically detects dependencies between your resources. This process removes some of the work involved in template authoring.
-
Type validation and IntelliSense: The Bicep extension for Visual Studio Code features rich validation and IntelliSense for all Azure resource type API definitions. This feature helps provide an easier authoring experience.